Sunday, September 26, 2010

Ode to an Old Piano

I have some sad news to report. In the name of progress, and for the general improvement of our domicile we had to put our old piano out of its misery. It wasn’t easy. No one likes to see what was once a fine instrument whacked into bits, but it had to be done.

Let me explain.

Every house has things you love about it and things you wish you could change. When we first saw this house five years ago we noticed it had many fine qualities. It had plenty of bathrooms, plenty of bedrooms, a lovely (albeit small) kitchen, a yard with great potential, and a wonderful location on a quiet street facing a park. Those were the pluses. The minuses included the small kitchen, and no “mud room” to speak of. I was also a little worried at first that there would be no place for large family gatherings or entertaining. But once the realtor took us down to the basement all my worries were put to rest. She showed us a wonderfully large family room, which was clean and bright, and even came with a large upright piano. Perfect.

But a few months ago, with a Bridal Shower in the works, I took a fresh look at our wonderful basement family room and soon discovered some changes needed to be made – and soon!

Our first problem was the cat hair. I knew that the only way to get our family room back was to give Sophie away. Thankfully, that was done within a week, and our beloved basement-only cat is now another family’s farm cat, and quite happy.

The second problem (dare I confess) is the mold. A careful examination revealed mold on the walls, on the carpet, and even on a few pieces of furniture – including the old piano. Yuck. I cleaned it up as best I could for the shower, but we knew more extreme measures would need to be taken in order to better correct the problem.

And so this fall we plan to de-mold our basement, beginning with the piano and carpet, and eventually including removal of the paneled walls and a thorough cleaning of the brick foundation. It’s a big project, but little by little we’ll see it through.

I did call our piano tuner to ask if he thought the old girl or any parts of her would be worth saving. He said no. It all could go. Next came the demo. There’s no way we could lift it up the steps as is. (We wonder how it got down there in the first place!) So Jeff got out his axe and started whacking.

I didn’t watch, but I heard. Each time he hit her she made an ugly sound, as if moaning in protest. I can’t describe it, but take my word for it, it was not pleasant. Eventually Jeff’s axe was not enough, and he got out his power saw. The cacophony of whacking, screaming power tools, and piano moans was nothing short of horrific. But then, all was quiet.

“It’s done,” Jeff told me as he came up from the basement, covered in dust and sweat.

“Nice work,” I told him, but I felt like I was congratulating an executioner.

I waited until the next day to take a look. I knew I would find it disturbing. And it was. But I also found it strangely artistic. Before I knew it I had my camera out and I was taking pictures. There was beauty in that pile of twisted string and slivered wood. Do you see it?


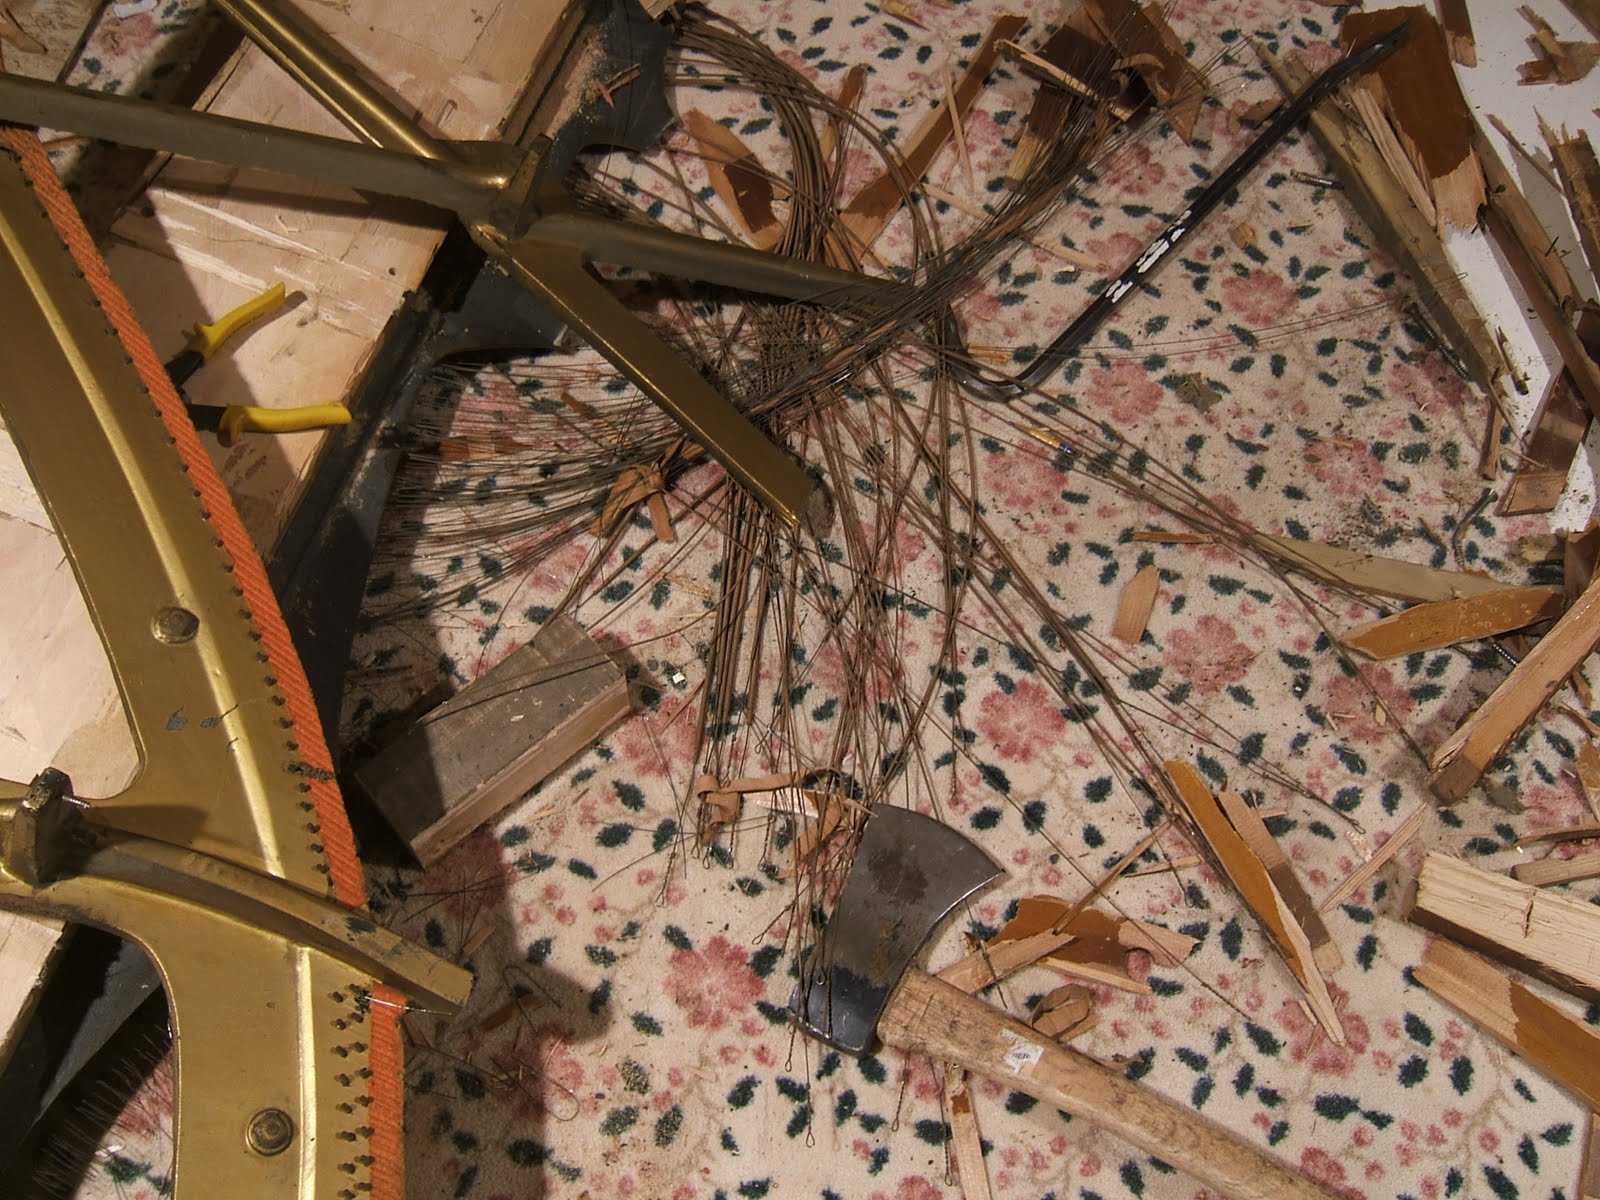
Looking at the pile of debris that was once a fine musical instrument made me wonder. How much music did that old girl give over the years? Was she once a treasured family possession? She must have been. I can just imagine her sitting in the parlor of an old Victorian on German Street. Friends and family gathered round, singing hymns and folk songs. No doubt it was a lovely scene. Quite different than the sights and sounds she made when the axe drove large divots into her side. Poor thing. But it had to be done.

Yesterday we took her remains to the landfill and put her to her final resting place. I wrote a short ode for the occasion.

You used to stand tall

Playing music for all

Whatever notes we requested

But you got old

And covered in mold

And so your days finally ended.

We will not cry

As we say good bye

To our piano, our keyboard, our friend.

For your notes will play on

In melodious song.

Great music reverbs without end.

A few notes: This piano was our “spare.” It was quite out of tune, and rarely played. We couldn’t have given it away because lifting it up the stairs would have been impossible. It was also quite covered in mold, and other disgusting stuff. Our beloved Kimball is truly a family treasure. She’s in the living room upstairs and is played daily.

I used several not-so-familiar words in this blog. For those of you who wish to expand your vocabulary, here’s a short glossary:

Domicile - place of residence

Cacophony – a harsh, discordant noise or sound

Reverbs – a shortened form of the word reverberates, echos (I may have made this word up.)

Sunday, September 19, 2010

Sweet Boredom


This week I picked up some new calendar pages for my Franklin Covey planner. Last night I started filling them in. I began with school activities, practices, games, and concerts. Then I added my appointments, work schedule and so on. Can’t forget the Birthdays and Anniversaries. Mom and Dad’s was yesterday. Happy Anniversary, guys!

It’s kind of fun watching my calendar fill up. I like having things to do. But still. I need to be careful. I don’t want to make my life so busy that I don’t have time to be bored every now and then.

You remember boredom. It’s that thing most of us middle-aged or older people experienced nearly every summer. It came to us when the chores were done (or it was too hot to work) and the day wore on. No one owned a computer, and TV’s were for evenings and Saturday mornings only. So what’s a kid to do, but sit outside and watch the world go by.

I still remember lying out on the lawn, looking up at the clouds. I hardly noticed the cats rubbing up beside me, the birds flying across the sky, the sound of the screen door slamming as someone went in or out of the house. I just laid there and let my thoughts wander where they would. Mom called it daydreaming. I called it being bored, but I was careful not to voice it. Proclaiming you were bored was a sure fire way to be given extra chores. So I just laid there and did nothing. Nothing but think and watch the clouds go by.

Fast forward to 2010. Most everyone I meet has a planner that looks like mine, filled with important appointments, meetings, and work. I mean we have to work! How can we support a lifestyle as busy and “full” as this if we don’t make a little money? But here’s the irony of it all. Even though our planners look full, it seems as though life has thinned out. I know it doesn’t make sense. I mean a busier life should be a fuller life, right? But somehow it doesn’t work like that. The more we try to squeeze in to every week, the more we lose. We’re all so afraid of missing out on what life has to offer, that we’ve filled our lives to overflowing, and all the most important things are slipping away. Things like perspective, contentment, and imagination.

So I’ve tried to leave a few gaping holes here and there on my calendar. Hopefully, a few of those will stay empty and I’ll have time to enjoy that precious commodity, sweet boredom.

Sunday, September 12, 2010

5-Star Soup in 16 Steps

I do not claim to be a great cook. However, several years ago my mom explained to me in great detail how to make a tomato-based soup, and I have been making it ever since. I’ll now share this recipe with you. I call it my 5-Star Soup because it is:

  1. fun and easy to make
  2. affordable
  3. freezes well
  4. VERY good for you
  5. delicious

For those of you more experienced cooks, my 16 Steps may seem a bit much, but I tried to explain it the way I appreciate having things explained to me…detailed, with pictures, and no assumptions that I know how to do any of this.

Here we go…


Step - 1 Gather your tools.

You will need:

a large pot (Often called a “Dutch Oven.”)

a large spoon or spatula (I like to use the plastic pancake flipper kind.)

a cutting board

a sharp knife

a ladle

plastic containers for freezing (I always use frosting containers.)

a permanent marker

a blender (I got mine as a bridal shower gift from my late Grandma Loss. I suggest you shop Thrift Stores if you decide to buy one. Otherwise you could ask to borrow one from any apron-clad housewife.)


Step 2 – Gather your Ingredients

16 small tomatoes (the size of billiard balls or smaller) or 12 large ones (the size of tennis balls or larger)

½ to 1 lb. ground beef (Also known as hamburger. The more you use the heartier your soup will be, but the less healthy it will be!)

any or all of the following fresh veggies: onion, celery, garlic, carrots, beans, potato

any or all of the following frozen veggies: beans, carrots, corn, peas

5 cans of tomato soup. You don't need them now, but I do think it's a good idea to add a can of tomato soup for extra flavor and fullness when you're making some for a meal.


Step 3 – Brown the ground beef in the pot. Smash it with your spatula or spoon while frying it over medium heat.


Step 4 – Pour off the grease. WARNING: Don’t pour it down the drain or it will clog your pipes. And don’t pour it into an empty garbage can or it will melt through your trash bag and make an awful mess.


Step – 5 Chop up onions, celery, and/or garlic and add to pot.


NOTE: At this point you may need to turn off the heat, because it’s time to work on the tomatoes and you don’t want your meat and veggies to burn.


Step – 6 Wash your tomatoes.

Gently rub them under cool running water. Use your finger nail to remove dirt.


Step 7 – Cut out the stem.

Like most of my photos, this is a two-handed job, but I needed one hand to take the picture.


Step 8 – Slice the tomato into chunks.


You can quarter the small ones, but large tomatoes may need to be cut into 6 or 8 pieces.


Step 9 – Chop them in the Blender.

Add the tomato chunks to your blender. Fill it about ¾ full (no more than 4 tomatoes worth), put the cover on, and use the pulse button to chop the tomatoes in short bursts until all large chunks have been chopped and you don’t hear any violent cutting any more.


NOTE: Sometimes the chunks get stuck above the blades, and you need to push them down. To do so, simply remove the cover, and use the handle of any kitchen tool to push the tomatoes down toward the blades. Replace the cover, and try again.


Step 10 – Add tomatoes to pot.

Slowly pour the tomato mixture into your pot with the meat and veggies. If you notice any large junks of tomato, fish them out and return them to the blender to be chopped with the next batch.

Repeat steps 6 – 10 until all your tomatoes are now chopped and in the pot. If you have not already done so, return your pot to the stove, and turn the burner to medium.


Step 11 – Cook and stir for 30 minutes.

Your soup now needs to simmer for 30 minutes. Keep an eye on it and stir it every 5 or 10 minutes to prevent stuff from sticking to the bottom and to insure it all cooks evenly. If the soup bubbles so violently that it makes a lot of noise and splatters all over the stove, you’ll need to turn the heat down. If it doesn’t look like it’s doing anything, you’ll need to turn the heat up.

TIP: You may notice a layer of foam develop on the surface of your soup. Go ahead and skim this off with your spatula or spoon. Nobody likes frothy soup. And you don’t need to hover over your pot the entire 30 minutes. Work on your crossword puzzle, sort through your mail, or better still, clean up the mess you’ve made so far. As mom always says, “Clean as you go!”

This is also a good time to add seasonings, however I would caution you not too add too much salt, if any. Herbs and other flavorings are fine, but later you’ll be adding a can of prepared tomato soup which has plenty of salt in it.

Step 12 – Add fresh veggies.

After your soup has simmered for 30 minutes or so it’s time to add the fresh veggies, such as carrots, beans, and/or potatoes. I usually only add one unpeeled potato at this point since the other veggies are included in my bag of frozen vegetables. Chop it into little chunks and plop them into your pot. Stir.


Step – 13 Add frozen veggies

As you’ve probably figured out by now, there’s no real measuring when you make soup. That’s why it’s such fun. Each batch is unique! So when you add your frozen veggies, if you decide to do so, you can put in whatever kind you want, in whatever amount you want. I added about 2 cups to this batch. Stir.

Step 14 - Cook 15 - 20 more minutes. (Until the potatoes are done.)

Doesn’t that look good!

Step 15 – Remove from heat.

Let it cool. I wait about a half an hour before I put the soup into my plastic containers. If you try to do it when it’s hot, it’s just too hot to handle.

Step 16 – Ladle it into containers.

Using your ladle, carefully pour the soup into your plastic freezer containers. Cover, label the lid with the date and contents, and freeze.


NOTE: One large pot of soup usually is enough to fill 5 - 2 cup containers. But that doesn’t mean it makes 5 servings! Read on…


LATER…

Here’s how to heat and serve your 5-Star Soup:
1. Thaw out one container. (Either put it in your fridge for a day or two, or microwave it.)
2. Place it in a medium sauce pan.
3. Add one can of tomato soup and one can of water.
4. Heat and serve.

NOTE: One fifth of the entire batch (or one 2-cup container's worth) when prepared with the extra can of tomato soup, makes 4 large bowls of soup. So the entire batch of 5-Star Soup ends up making 20 servings, at around 50¢ a serving!